
How to Make a Flogger?
The art of crafting a flogger it’s not your everyday dinner-table conversation. Is it? Most people are busy knitting scarves or building birdhouses, but not you! You’re here to learn how to make something that could tickle your fancy… Or perhaps you are back, depending on how you wield it.
Before we jump into the world of (vegan) leather, knots, and intrigue, I must warn you. This DIY project may just sweep you off your feet... or at least give you a friendly pat on the back!
Prepare yourself for something a little bit different, and learn how to make a flogger!
Why Make Your Own Flogger?
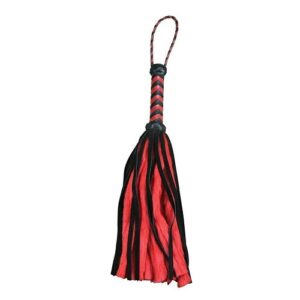
Floggers are like snowflakes, each one as unique as the sensation it provides. Here’s where you can let your inner fashion designer roam free. The vegan leather for a classic touch, suede for a soft caress, or even rope for a nautical naughtiness.
You can find these at your local craft store, or better yet, recycle old materials and save the planet while you’re at it!
Choosing Materials
Floggers are like snowflakes, each one as unique as the sensation it provides. Here’s where you can let your inner fashion designer roam free.
The vegan leather for a classic touch, suede for a soft caress, or even rope for a nautical naughtiness.
You can find these at your local craft store, or better yet, recycle old materials and save the planet while you’re at it!
Designing Your Flogger
Now, grab your scissors, some glue, and put on your favorite crafting playlist. Here’s how to bring your design to life:
1. Cutting the Strands
Measure twice and cut once. Imagine you’re giving your flogger a stylish haircut. Each strand should be even and sleek. Pro tip: If you talk to your strands like a hairdresser, they’ll behave better (or at least you’ll have more fun).
2. Preparing the Handle
Think of this as the spine of your flogger. Choose something sturdy and fabulous. Wrap strands around it like they’re hugging an old friend. Secure them tightly because nobody likes a loose handshake.
3. Assembling the Flogger
Twist, knot, and dance your way through this stage. Your flogger is starting to take shape, and it’s all thanks to your nimble fingers. Don’t be shy; experiment with different techniques to find what clicks (or swishes).
4. Adding Final Touches
Beads, charms, or a scented spray for an aromatic surprise? This is where you put the cherry on top. Don’t hold back; let your creativity run wild!
Safety and Usage Tips
Your gorgeous flogger is ready, but before you start playing, here are some tips:
- Store it with care, like you would a delicate perfume or a vintage wine.
- Play safe, and never forget the golden trio: communication, boundaries, and consent.
- A wink and a smile can go a long way, but always ensure you’re both on the same delightful page.
Conclusion
Voilà! You’ve just crafted something beautiful, unique, and downright thrilling. Your flogger symbolizes creativity, connection, and the joy of shared experiences. So, whether you’re a DIY diva, a curious cat, or a playful partner, take a bow – you’ve earned it!
Read also: what is a flogger?
FAQ
What materials can I use to make a flogger?
When making a flogger, materials like leather, suede, or rope can take center stage. Your flogger, your choice!
How long does it take to create my own flogger?
Creating a flogger can take an afternoon or longer if you feel especially artistic. In other words, take as long as your flogger desires.
Can I make a flogger with recycled materials?
Absolutely! Making a flogger with recycled materials adds an eco-friendly twist to your saucy creation. Recycle, design, and enjoy!
What are the best techniques for assembling a flogger?
Assembling a flogger requires twisting, knotting, and experimenting with your techniques. Your flogger might even teach you a new dance move or two!
You may also like


Table of Contents
Toggle